|
1.3.66
|
|

| |
|
1.3.66
|
|
|
| |
This page will guide you through installation and set-up of dependent software needed to build and run Helios-based programs.
As Helios is simply C++ code, it can be used on any platform that supports C++ programming. If you prefer to use an interactive development environment (IDE), two great options are CLion by JetBrains (recommended) and VS Code. These IDEs are available on Windows, Linux, and Mac, and make setting up Helios projects relatively easy. CLion is free for educational purposes, and is loaded with very nice features for C++ development such as direct display of Helios documentation. VS Code also works, but is a little more clunky. Building and compiling from the command-line and using any text editor such as Vim or Emacs also works just fine.
Running Helios requires several dependent packages to be installed, depending on the plug-ins you are using. The sections below detail manual installation of dependent packages for Windows, Linux, and MacOS.
For Linux and MacOS, there is also a script that can be used to install all required packages for all plugins automatically, simply run the following shell script 'utilities/dependencies.sh' with the argument "ALL" (or with no arguments) as follows: source dependencies.sh
There are a few additional options for installing dependencies if it is not necessary to use all plugins.
To install only the dependencies required to run Helios with no plugins (or plugins that require no packages), use the argument "BASE": source dependencies.sh BASE
To install only the dependencies required to run Helios with the visualizer plugin, use the argument "VIS": source dependencies.sh VIS
To install only the dependencies required to run Helios with CUDA (required for the Aerial LiDAR plugin, and optional for the Radiation plugin when using the OptiX backend on NVIDIA systems), use the argument "CUDA": source dependencies.sh CUDA
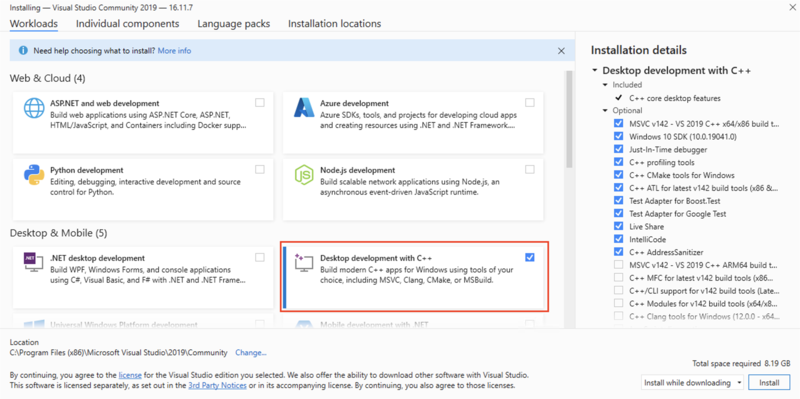
Download and install Microsoft Visual Studio Community 2022 if your GPU has compute capability of 5 or higher. You can look up your GPU's compute capability here. If your compute capability is less than 5, you'll need to download Visual Studio Community 2019 and CUDA 10.2 to ensure compatibility. The link to download older versions of Visual Studio is here: https://visualstudio.microsoft.com/vs/older-downloads/. It will require that you join the free Dev Essentials program in order to access the old downloads. Once you have reached the downloads page, Download Visual Studio Community 2019. For more information on choosing your compiler version, consult this page.
Once you have successfully downloaded the EXE install file, you can run it to perform the installation. The important step is to be sure to install the optional packages for C++ Desktop Development. The figure below shows the check box to enable. When the installer finishes, there is no need to actually open Visual Studio, and you can move on to the next step.
It is recommended for PC that you download and install the CLion IDE, found here: https://www.jetbrains.com/clion/download/#section=windows. Refer to the documentation page Using the CLion IDE with Helios for information on how to get a free education license.
When you open CLion, it will prompt you to open a project. You can have it automatically pull the Helios code from GitHub by clicking on the icon labeled "from VCS". By default, it should bring up Git as the default version control system. You may need to install Git, which can be done by simply clicking the button to download and install. Then, type in the URL for the Helios GitHub repository "https://www.github.com/PlantSimulationLab/Helios", select the directory where you'd like the Helios source code to be located, and hit "Clone". This should give you a fresh copy of Helios within CLion with the README file displayed.
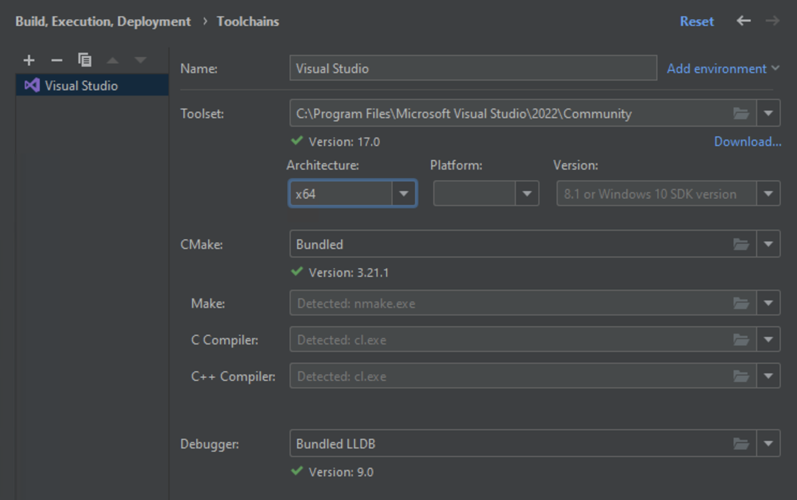
The next step is to set up the Microsoft Visual Studio C++ compiler in CLion. It may automatically open up a new project wizard, but you can also do it yourself by going to File->Settings, then in the left pane, go to "Build, Execution, Deployment->Toolchains". With any luck, it should automatically add and detect Microsoft Visual Studio. If it doesn't, click the "+" icon and click on "Visual Studio". It may also detect and use MinGW as the default toolchain. It is recommended to remove this toolchain by clicking on it and then the '-' button.
We then want to change the "Architecture" to "x64" to build in 64-bit mode. Note that this will likely not be an option in the drop-down menu, but you can just type it in. If you do not get the green check boxes and a successful auto-detection as shown below, there is a good chance that you did not install Visual Studio correctly, and you missed the step to enable C++ tools.
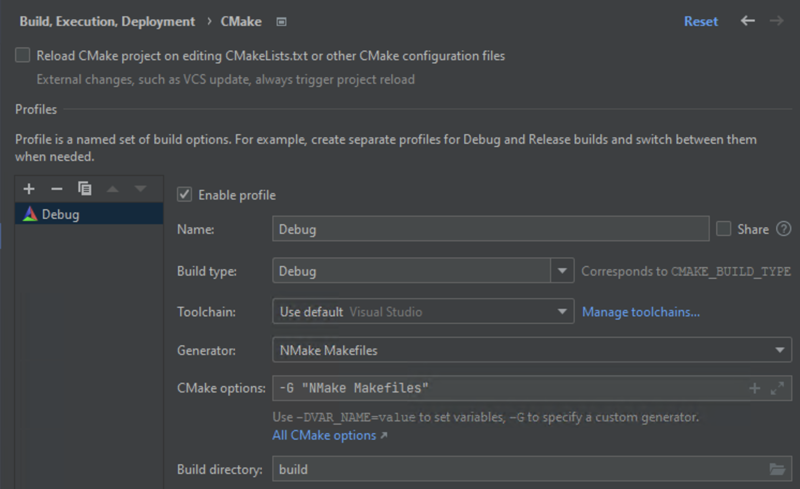
The last step is to verify the build settings by clicking on the next option down from "Toolchains" which is "CMake". Under "Toolchain" verify that it is using Visual Studio as shown below. Next, under the "Generator" drop-down choose "NMake Makefiles". If it says "default: NMake Makefiles", it is a good idea to select the dropdown and explicitly choose "NMake Makefiles" because this can sometimes be automatically changed to "Ninja" without warning. Note that prior to CLion v2021.3 there is no Generator drop-down, but it should use NMake Makefiles by default.
That should be all that is needed to build basic programs that do not require CUDA. You can test by building the context_selftest project in the "samples" directory. In the left "Project" pane (main CLion window), expand the "samples" folder, and the subdirectory called "context\_selftest". Right-click on the CMakeLists.txt file in that directory and select "Load CMake Project". You should then be able to compile and run it by clicking the play icon in the upper right hand corner of the CLion window. If you get build errors that have the word "Ninja" in various places, you missed the previous step changing the Generator to "NMake Makefiles".
The NVIDIA CUDA library is required to build the Aerial LiDAR plugin. For the radiation model, CUDA enables the OptiX backend (which is the preferred backend on NVIDIA systems), but is not required if you use the Vulkan backend instead. Consult this page for help choosing the right CUDA version based on your C++ compiler and GPU compute capability: Choosing the right CUDA and OptiX version.
The latest CUDA version can be downloaded here: https://developer.nvidia.com/cuda-downloads (note that if you installed Visual Studio 2019 instead of 2022, you'll need to install CUDA 10.2 instead of the latest version). Download the base CUDA Toolkit installer for your Windows OS. Installing from the "exe (network)" type will result in a smaller file being downloaded. Click through the installer and accept all the default options. By default, it should have installed to 'C:\Program Files\NVIDIA GPU Computing Toolkit\CUDA\v1X.X\', where v1X.X is the version that you installed. You can verify this installation location using the file browser.
In order to use CUDA within CLion, you need to tell it where to find the CUDA toolkit. To do this, open up the settings in CLion, and go to "Build, Execution, Deployment" and then to CMake. Click the icon next to the "Environment" field to edit environmental variables. Find the variable named "Path", and double click to edit it. At the end of the list of directories, add the path to the CUDA bin folder, i.e., 'C:\Program Files\NVIDIA GPU Computing Toolkit\CUDA\v1X.X\bin;'. Make sure there is a semicolon before and after the path, and that you replace the v1X.X with your actual CUDA version. It is important to hit the return key, which should cause the Path variable list to turn blue. When you hit OK, the Path variable should be listed under the Environment field.
Once that is done, you can test it by building and running the self-test for a CUDA-based plug-in such as the energy balance model following similar steps above for the context_selftest. If you get a CMake error that asks you to 'Specify CUDA_TOOLKIT_ROOT_DIR', it can't find your CUDA install, and most likely you set the "Path" variable incorrectly.
The Windows timeout detection (TDR) mechanism can erroneously detect that the GPU has stopped responding while it is performing calculations, resulting in a "Display driver stopped responding and has recovered" error. The TDR can be disabled by following the instructions here: https://docs.nvidia.com/deploy/pdf/CUDA_TDR_delay.pdf. The instructions are also given below:
Both the OptiX 8.1 and OptiX 6.5 backends are bundled with Helios and do not require a separate OptiX SDK installation. The OptiX runtime is loaded from the NVIDIA driver at runtime via optixInit(), so as long as the NVIDIA driver is installed in WSL, no additional steps are needed.
If you encounter issues finding the NVIDIA driver inside WSL, run the dependencies script in the utilities/ folder:
source dependencies.sh
This will automatically install and configure the Linux driver components needed to run CUDA and OptiX inside WSL.
The radiation model uses GPU-accelerated ray tracing via the Vulkan compute backend, which works natively on Windows through standard GPU drivers (NVIDIA, AMD, and Intel all include Vulkan support in their drivers). The required development libraries are distributed as a single installer from LunarG.
Download and run the LunarG Vulkan SDK installer for Windows, accepting the default options. The SDK includes the Vulkan headers, the Vulkan loader, and the glslangValidator shader compiler required to build Helios shaders.
VULKAN_SDK environment variable that is only visible to processes launched after the install completes. You can verify the installation by opening a new PowerShell window and running glslangValidator –version.After restarting, CMake will automatically detect the Vulkan SDK via the VULKAN_SDK environment variable and enable the Vulkan backend when building the radiation plugin. No additional configuration is required.
If you are using the CLion IDE, you will at a minimum need to ensure that Git is installed on your system. Simple command-line tools are available to easily install dependent software libraries. The appropriate commands will be given in the documentation to install any required libraries. For Linux systems, the apt-get command can be used, which comes pre-installed.
Git: It is recommended to install Git in order to facilitate easy download and updating of the Helios source software. This can be accomplished via the command line "sudo apt-get install git". Note that currently CLion does not have an option to automatically install Git like on Windows or MacOS.
When you open CLion for the first time, or by going to "File->New->Project from Version Control", the default Version Control system should be Git. Type in the URL for the Helios GitHub repository: "https://www.github.com/PlantSimulationLab/Helios", select the directory where you'd like the Helios source code to be located, and hit "Clone".
If you are opening CLion for the first time, it should also open up a Toolchain Wizard window (or you can find it by going to "File->Preferences->Build, Execution, Deployment->Toolchains". It should automatically pick up Make and the C/C++ compilers if they come pre-installed on your system. If they are not auto-detected, you can install them from the Terminal command line: "sudo apt-get install cmake gcc g++".
Next, click on the "CMake" tab below Toolchains and be sure the "Generator" drop-down is set to "Unix Makefiles" and NOT Ninja or Default. You can also change the Build directory if you like, such as to simply be "build".
Once these have been installed at the system level, this is everything you will need to build basic Helios programs that do not use CUDA-based plug-ins or the Visualizer. If you are not using CLion, you can install git, cmake, gcc, and g++ from the command-line and build/compile using commands as detailed in the main Helios User Guide.
The NVIDIA CUDA library is required to build the Aerial LiDAR plugin. For the radiation model, CUDA enables the OptiX backend (preferred on NVIDIA systems), but is not required if you use the Vulkan backend instead. While CUDA can be installed on Linux via apt-get, this tends to often cause problems. It has proven more robust to simply download CUDA from the NVIDIA website and run the installer. Consult this page for help choosing the right CUDA version based on your C++ compiler and GPU compute capability: Choosing the right CUDA and OptiX version.
Note that individual plugins may have their own library dependencies. Consult their documentation for dependency information. The latest CUDA version can be downloaded here: https://developer.nvidia.com/cuda-downloads. However, you'll want to be sure that the version of CUDA that you install works with your compiler version. This website has a table showing compatibility for all versions: https://gist.github.com/ax3l/9489132, check the g++ column. To figure out which version of g++ you have, you can type the command "g++ --version".
The Linux installation guide for the latest version of CUDA can be found here: https://docs.nvidia.com/cuda/cuda-installation-guide-linux/index.html. If you are installing an older version, you can find its Linux installation guide within the documentation for that specific version. Note also that Table 1 gives gcc/g++ compiler compatibility information.
Probably the easiest installation approach is to use the runfile installer type. When you choose this option on the downloads page, it will give you two commands to run the installer: 1) a 'wget' command to download the installer, 2) the command to run the downloaded installer. Complete instructions can be found in Section 7 of the latest Linux install guide. Note that one of the steps is disabling the Nouvou graphics drivers, which disables the "free" graphics driver that may be on your system and can conflict with the NVIDIA driver. This can be done in a few easy commands:
A restart is then needed. It is usually a good idea to install the graphics driver that comes with the CUDA installer to avoid incompatibility issues.
The radiation model uses GPU-accelerated ray tracing via the Vulkan compute backend. On Linux, the required libraries can be installed directly from the system package manager. You need the Vulkan development libraries and the glslangValidator shader compiler:
After installing, CMake will automatically detect the Vulkan SDK and enable the Vulkan backend when building the radiation plugin. No additional configuration is required. You can verify the installation by running glslangValidator –version.
mesa-vulkan-drivers).The last set of dependent packages you are likely to encounter are related to the Visualizer plug-in. A single apt-get command is listed in the Visualizer documentation to install these dependent packages.
CLion provides the ability to install all required dependent software (except for CUDA, see below) directly from the IDE. When you open CLion for the first time, or by going to "File->New->Project from Version Control", the default Version Control system should be Git, and it should prompt you to install git along with XCode. Follow the prompts to do so, but if it fails you can also install XCode from the App Store. Type in the URL for the Helios GitHub repository: 'https://www.github.com/PlantSimulationLab/Helios', select the directory where you'd like the Helios source code to be located, and hit "Clone".
If you are opening CLion for the first time, it should also open up a Toolchain Wizard window (or you can find it by going to "CLion->Preferences->Build, Execution, Deployment->Toolchains". It should automatically pick up Make and the C/C++ compilers if you have XCode installed.
Next, click on the "CMake" tab below Toolchains and be sure the "Generator" drop-down is set to "Unix Makefiles" and NOT Ninja or Default. You can also change the Build directory if you like, such as to simply be "build".
Once these have been installed at the system level, this is everything you will need to build basic Helios programs that do not use the Visualizer.
If you are not using CLion, you can install and run everything you need from the command-line. Simple command-line tools are available to easily install dependent software libraries. The appropriate commands will be given in the documentation to install any required libraries. For Mac OSX, homebrew is a great package installer. Homebrew itself can be installed via a single command:
Git: It is recommended to install Git in order to facilitate easy download and updating of the Helios source software. This can be accomplished via the command line "brew install git".
CMake: Components of Helios are compiled using the CMake package (www.cmake.org). Version 3.15+ is required. CMake can be easily installed via the command line using homebrew "brew install cmake".
C/C++ Compiler: You will also need a C/C++ compiler installed - we recommend using the GNU compilers or the AppleClang compilers. The GNU compilers can easily be installed via the command line "brew install gcc".
The radiation model uses GPU-accelerated ray tracing via the Vulkan compute backend, which is supported on macOS through MoltenVK (a Vulkan implementation on top of Metal). Install the required Vulkan libraries with Homebrew:
After installing, CMake will automatically detect the Vulkan SDK and enable the Vulkan backend when building the radiation plugin. No additional configuration is required.